The 15 most common AMP1 'faults' that really aren't!
It doesn't happen often, but even we at BluGuitar are not immune to it: sometimes, an AMP1 unit is simply defective and has to be repaired or serviced. In this article, you will learn how to troubleshoot your AMP1 correctly - not that we hope you ever need to!
But there are also many cases where it's not the AMP1, but something else in your signal chain, that's the problem. There can also be cases of user error... we've compiled them all here so you can health-check your AMP1 yourself first before you start getting too worried!
1. Problems with the nanotube
The Nanotube is constructed in such a way that, according to specification, it has 3 times the service lifespan of an ECC83 tube. Due to the lower operating voltage in comparison to classic tube amps (which improves its characteristic curve and thus the sound), this lifespan is doubled or even tripled.
In addition, a common cause of problems with tubes has been eliminated for AMP1: contact problems on the tube socket. Traditional tubes are put into a socket, whereas the Nanotube is soldered directly onto the circuit board.
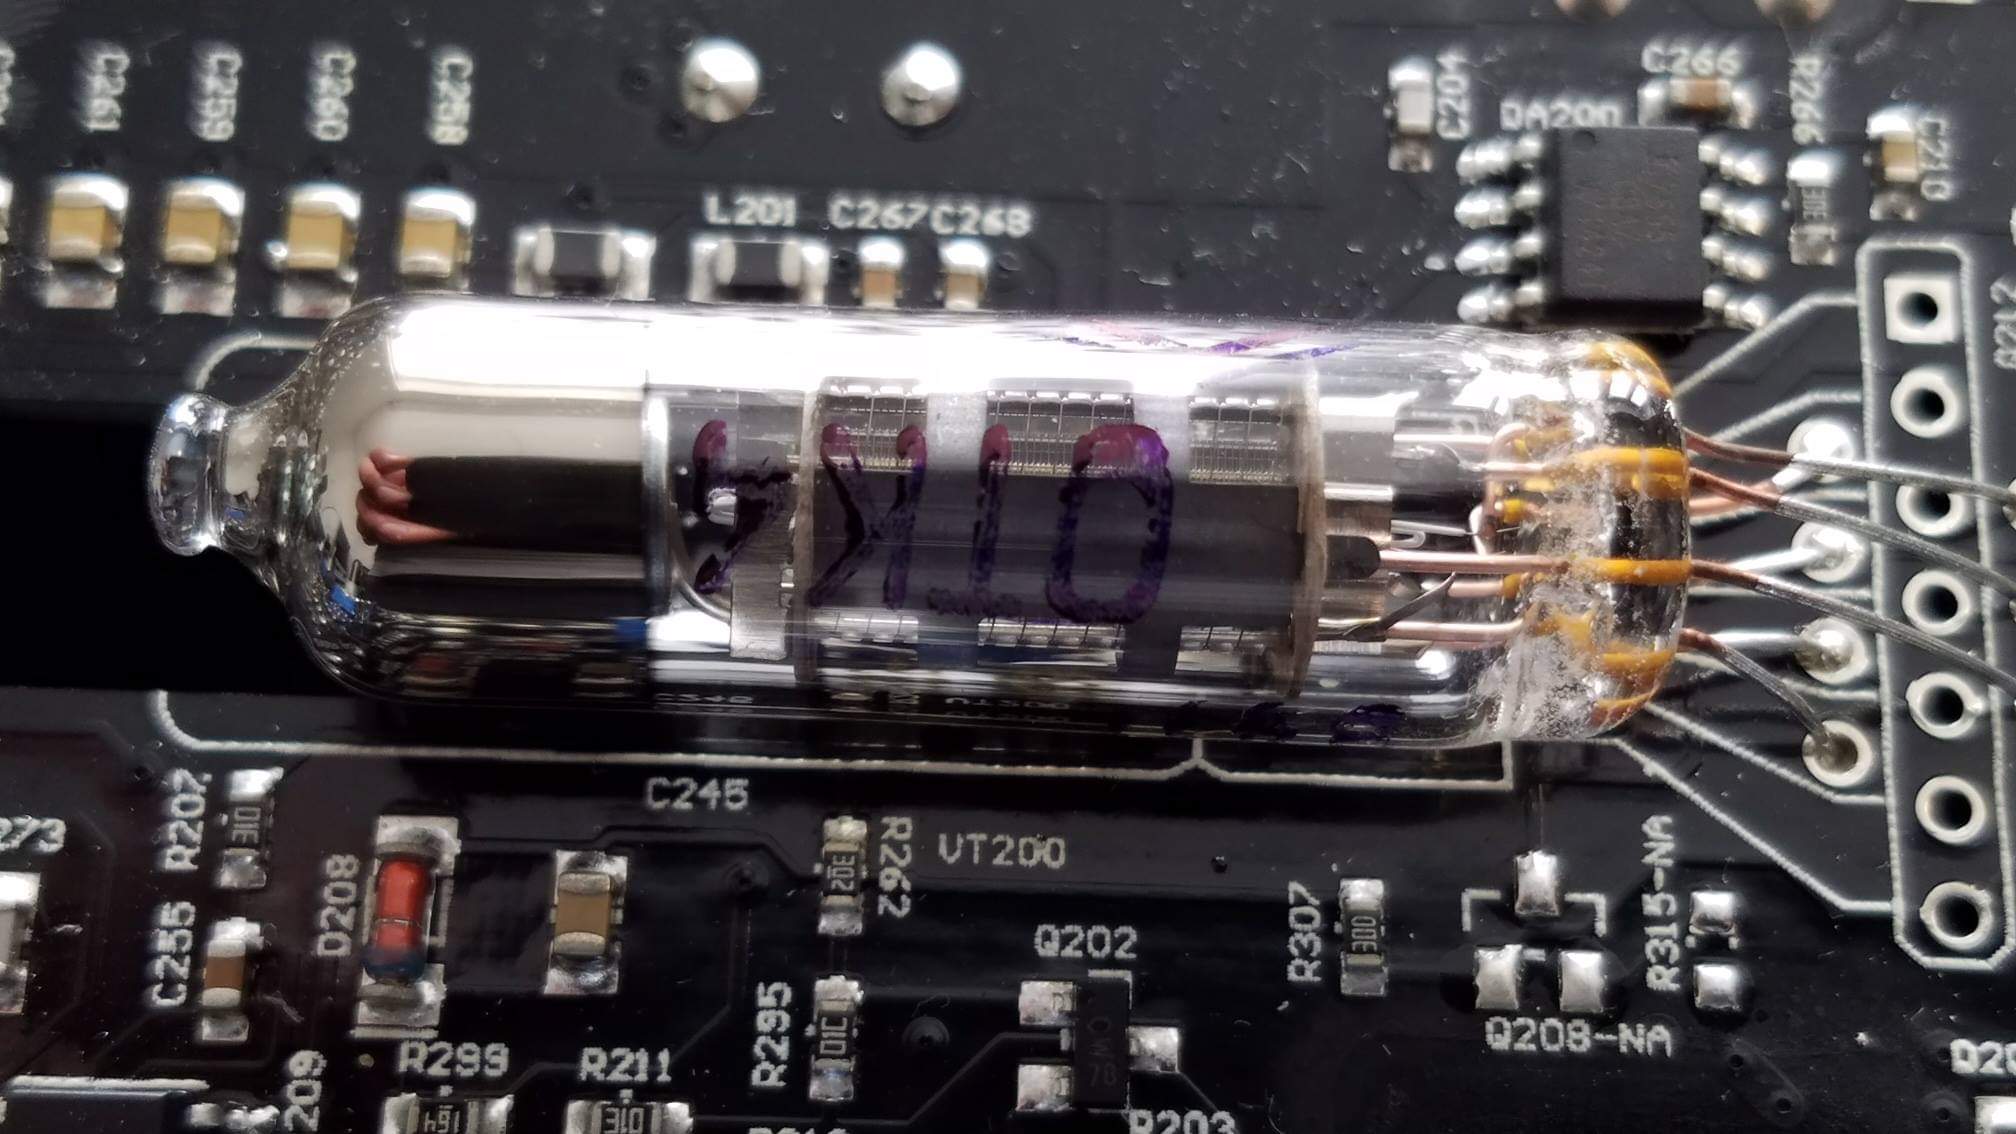
Lifespan: longer than that of the guitarist 😉
The sum of these facts results in the Nanotube probably still being working perfectly even when the guitarist's skills slowly decline and he has to hang up the guitar due to age. 😉
Joking aside: Due to its extremely long lifespan, a failure of the Nanotube is highly unlikely. It almost never has to be exchanged. With many thousands of AMP1s sold, we haven't had a single tube failure.
Video: Academy of Tone, Episode 38
2. The foot switches on the AMP1 don't switch what they should
You can find all the info here: Direct Access Mode and Preset Mode
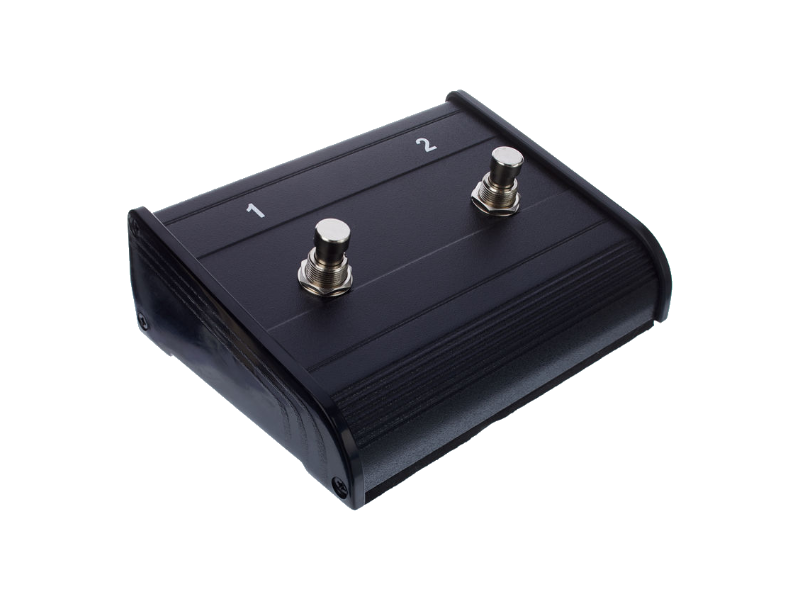
3. The external foot switch doesn't work properly
Our statistics say: you're using the wrong foot switch 😉
If you use an external footswitch in addition to the internal footswitches to switch the AMP1, it should have the following specifications to ensure that it works properly:
1-way or 2-way footswitch
You can connect a normal 2-way footswitch with a stereo jack to the footswitch connection of the AMP1 in addition to the REMOTE1 and the MIDI1 adapter. The two switches of the external foot switch then take over the respective functions of the left and middle internal footswitches of the AMP1 in direct access mode, i.e. CLEAN/OVERDRIVE and BOOST on/off.
A mono footswitch can also be used. This then switches between the clean and overdrive channels, thus taking over the function of the left internal footswitch of the AMP1 in direct access mode.
Switch (no button!)
The special feature of a switch (latching switch) in contrast to a button (momentary switch) is that it latches (on). With a latching footswitch, depressing the switch causes the circuit to close, enabling a specific function assigned to the switch. If the pressure is released from the foot switch, the circuit remains closed. Only by pressing the switch again is the circuit opened again and the assigned function deactivated.
A push button, on the other hand, requires a sustained press to keep the circuit closed and activate the function assigned to the switch. Releasing the switch opens the circuit and disables the function.
Stereo jack (2-way switch) or mono jack (1-way switch)
So that the footswitch switches the AMP1 properly, a 2-way footswitch should have a stereo jack plug, whereas a 1-way footswitch should have a mono jack plug.
If possible, no LEDs
The switching process with footswitches connected to the footswitch socket of the AMP1 is carried out by measuring the voltage at this socket. Footswitches without LEDs always work. A footswitch with an LED without an internal series resistor also works. In the case of footswitches with LEDs, however, the series resistor can be so large that the voltage drop is not sufficient to trigger the switching process.
More articles on the topic:
AMP1 + External Footswitch - How to get all 4 channels?
AMP1 + external footswitch - Why don't all footswitches work with LEDs?
4. MIDI doesn't work
MIDI problems are usually caused by something else. Here you can find helpful articles about the MIDI handling of the AMP1:
- How does MIDI LEARN work?
- MIDI LEARN does not work
- MIDI handling of AMP1 and Line6 HX Effects - a quick step guide
- MIDI handling issues with the Line6 HX Effects
- Problems with MIDI handling with the BOSS MS-3
- What is the difference between MIDI Program Change (PC) and Control Change (CC)
- Which parameters on the AMP1 can be controlled via MIDI Control Change (CC)?
5. Saving presets does not work properly
You can't really do much wrong when saving presets. There are only two things to keep in mind:
- Presets are created and saved in Direct Access Mode. Only to call up the presets do you switch to Preset Mode. Here you can find detailed information: Direct Access Mode and Preset Mode.
- With the AMP1 only switching functions can be stored in presets, but no control settings such as tone control, custom controls or MASTER VOLUME. Learn more here: Which AMP1 parameters can be saved in presets - and which can not?
6. The Power Soak doesn't work.
Honestly, we have never had a single case where the Power Soak actually did not work. Rather, there are all kinds of misunderstandings here about how such a Power Soak works, what it does, and how this manifests itself.
For example, we often hear that when the Power Soak is activated, the jump from 2 to 7 watts is audible, but no volume change is perceived above or below that. The good news is: if this jump is audible, the Power Soak also works..
Where the irritations come from in that case, what other misconceptions there are around the Power Soak, how it works, and how best to use it, you'll find out in these two helpful articles:
- The AMP1 Power Soak - functionality and areas of application
- When the HALF POWER MODE is activated, there is no difference in volume. Why is this?
7. Hum, sizzle, squeal: interference noise
In the vast majority of cases, noise such as hum, squeal, sizzle or feedback is actually caused by a device in the AMP1's periphery. Defective cables, jacks, wrong or inferior power supplies, wrongly wired guitar pickups... all this can lead to unwanted noise, which the AMP1 naturally multiplies with increasing distortion and volume. Here are tips on how to troubleshoot and locate and eliminate noise:
Delete8. The fan starts immediately
We get lots of feedback from AMP1 users who are surprised that the AMP1's fan is running permanently. In fact, the fan starts running as soon as the amp is turned on. In normal operation, however, it runs very quietly and can hardly be heard. Only when the temperatures in the amp rise does the fan switch to a higher level of operation, which means it also gets louder. As soon as the amp has cooled down enough, the fan switches back to normal operation.
The AMP1 Mercury Edition has a production batch in which the fan runs permanently at a level that is actually too high. This doesn't harm the device in any way, but the fan is clearly audible.
This can be changed by modifying the fan control (and is a process we at BluGuitar are experienced in carrying out). If the fan in your AMP1 is very loud, you can contact us here, stating the serial number of your AMP1 Mercury Edition. We will then check whether and under what conditions the modification of the fan control for your device is possible.
9. The reverb doesn't work
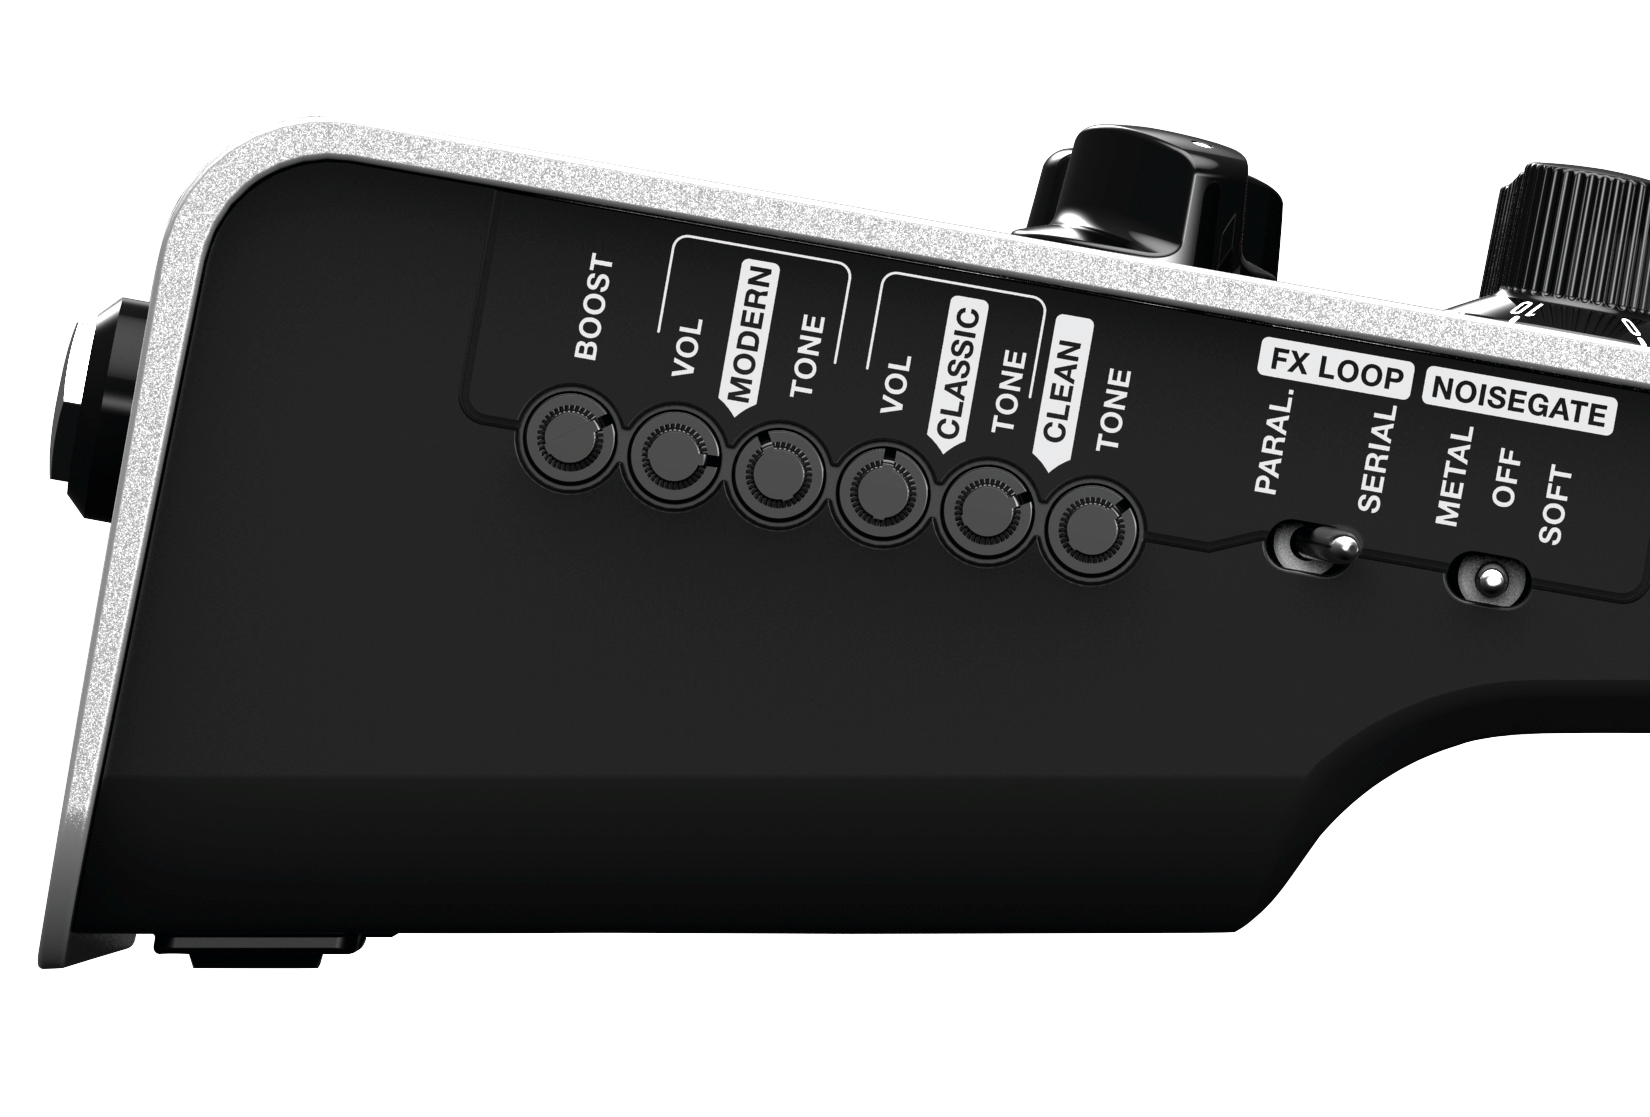
The problem here is actually not the reverb, but the noise gate. The REVERB sits in the signal chain of the AMP1 before the noise gate. If the Noise Gate of the AMP1 Silver Edition and AMP1 Mercury Edition is set to METAL, the fast and hard intervention of the gate leads to the reverb tail being cut off. If the Noise Gate is set to SOFT, the reverb tail will not be cut off.
On the AMP1 Iridium Edition, however, the Noise Gate automatically switches to SOFT as soon as the REVERB is activated. This prevents the gate from cutting off the reverb tail.
Delete10. The Noise Gate doesn't work properly
Some AMP1 users expect that the AMP1's Noise Gate should be able to suppress ambient noise generated in front of the AMP1 (e.g. noise caused by pedals connected in front of the amp). Unfortunately, this is not technically possible.
All three AMP1 versions have an integrated NOISE GATE - an intelligent suppressor of unwanted background noise. Compared to external noise gates, the signal in the AMP1 is evaluated at several points in the circuit at the same time in order to react as sensitively as possible. In this way, the NOISE GATE automatically and intelligently adapts to the channels and their gain settings so that as little signal as possible is lost.
.png)
The NOISE GATE switch gives you three options:
SOFT
SOFT - for all classic guitar sounds. The signal is attacked as little as possible, and only the background noise disappears when you are not playing.
DeleteMETAL
METAL - ultra-fast and hard gate response with extreme damping. Best suited for metal riffing at high gain.
DeleteMETAL setting: special features for Mercury and Iridium Editions
If the NOISE GATE is set to METAL, there are differences in the operation and functionality of the NOISE GATE on the AMP1 Mercury Edition and AMP1 Iridium Edition compared to the AMP1 Silver Edition:
-
CLEAN Channel: based on the assumption that in the CLEAN Channel a fast, hard-acting NOISE GATE is rather counterproductive*, the AMP1 Mercury Edition and AMP1 Iridium Edition automatically switch the gate to SOFT as soon as the CLEAN channel is activated.
- REVERB: with the AMP1 Iridium Edition, this principle is also applied when the REVERB is activated: as soon as the REVERB is activated, the NOISE GATE - regardless of which channel is activated - switches from METAL to SOFT. On the one hand, this prevents the reverb tail from being cut off by the gate. On the other hand, we assume that the reverb is primarily used for solo sounds, where a fast acting gate would prevent standing tones from fading away.
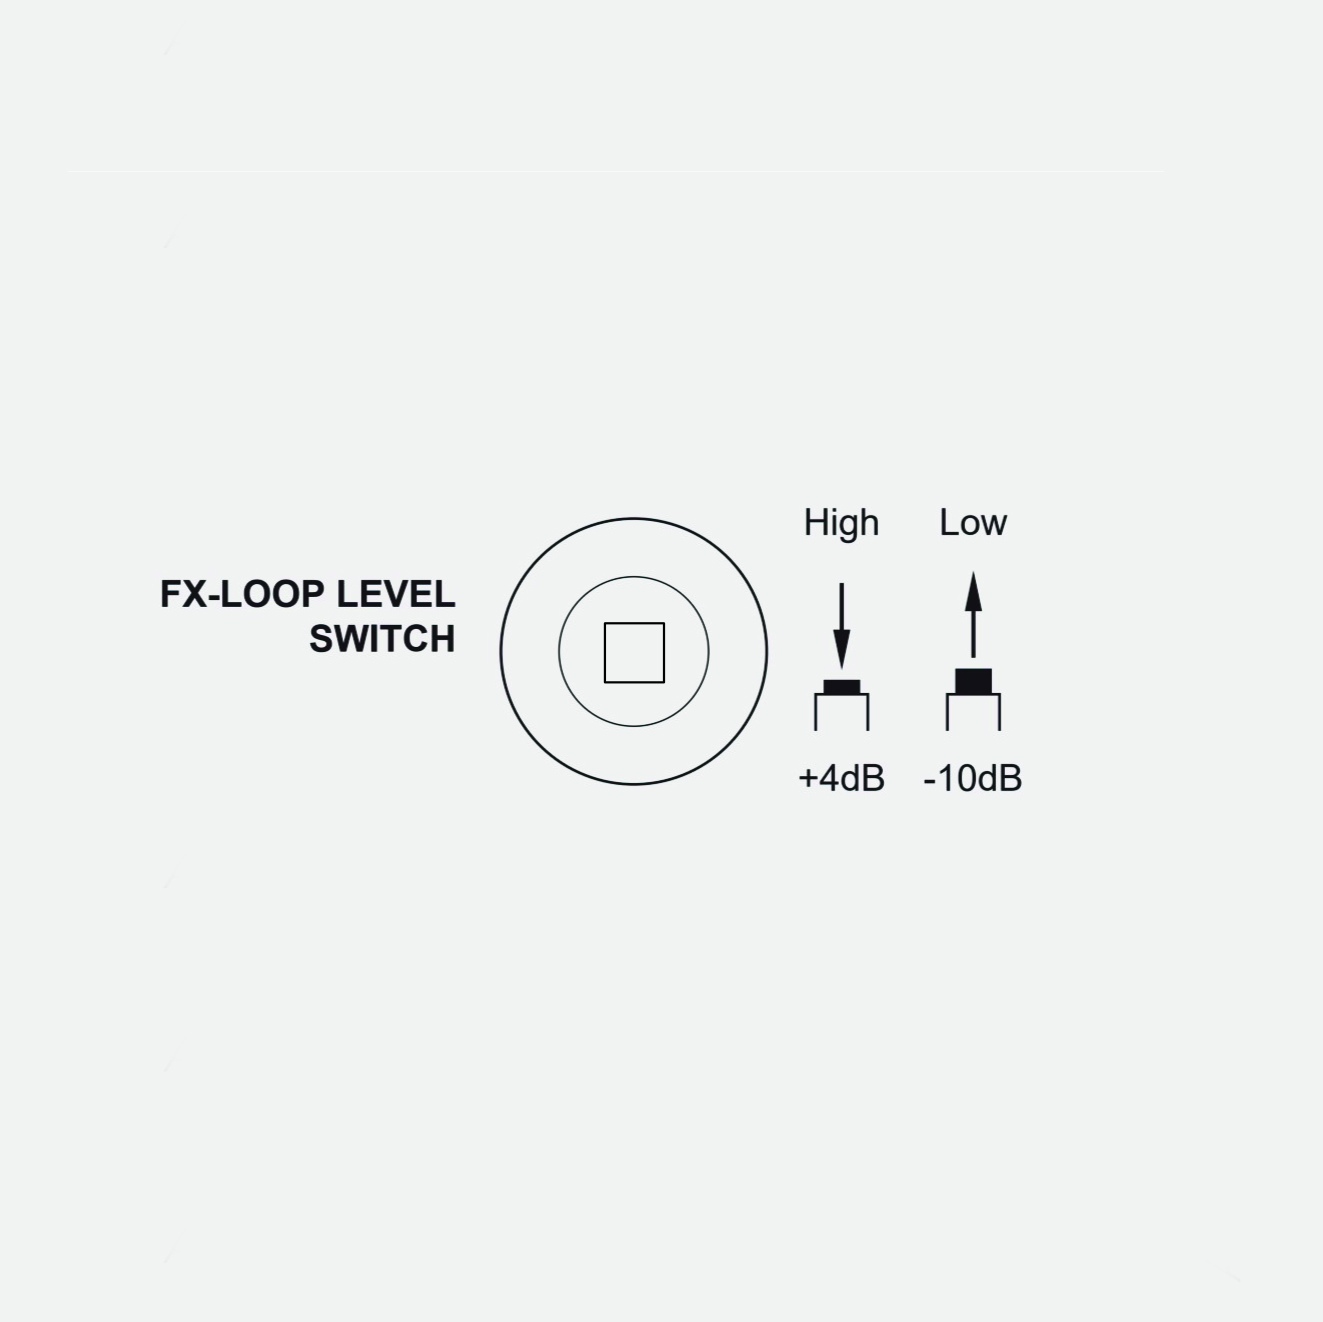
11. My AMP1 is missing the FX Loop level switch!
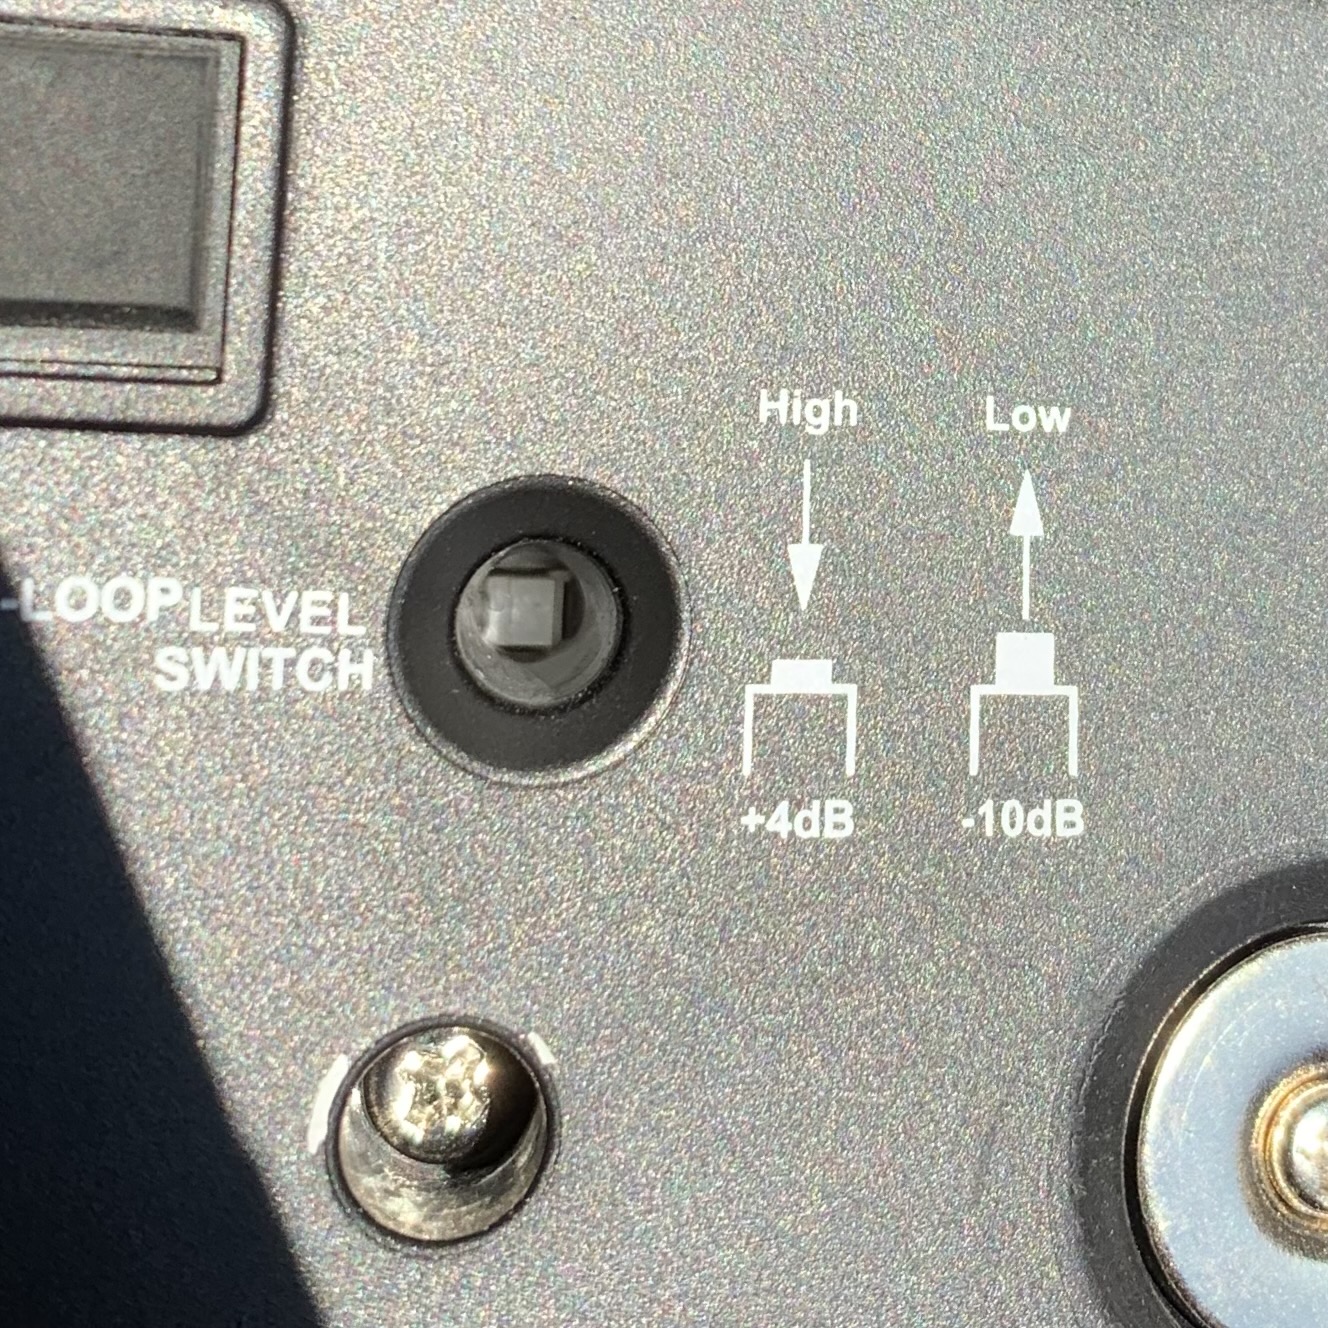
The FX Loop Level Switch, which can be used to switch the sensitivity of the effects loop from -10dB for vintage FX pedals to +4dB for modern pedals and studio effects units, is located on the underside of the AMP1. It is designed as a push-push switch and sits in a recess to prevent accidental activation, which means that it is not directly visible at first glance. To operate it, you need a long, thin object such as the jack plug of a guitar cable.
By the way: if you don't hear any difference in volume when you press the switch, this is not a sign that the switch is defective, but that it works. You can find out why this is and what exactly the switch does here: The FX Loop level switch does not work.
12. The FX Loop level switch doesn't work
If you don't hear any difference in volume when you press the switch, this is not a sign that the switch is defective, but that it works. This is because the switch raises or lowers the level of the FX Loop on both the FX SEND and the FX RETURN, which means that the overall level of the FX Loop remains the same. This means that the switch is not intended to make the FX Loop louder or quieter.
Instead, it is used to prevent effects devices or pedals that are primarily designed for use in front of the amp (e.g. the NUX Time Core, BOSS DD2 or vintage preamp effects in general) from starting to sound muddy or distorted because they cannot handle the FX Loop's Input level (see also muddy-sounding effects device in the serial FX loop). If the FX Loop Level switch is set to -10dB in such a case, the problem is usually resolved.
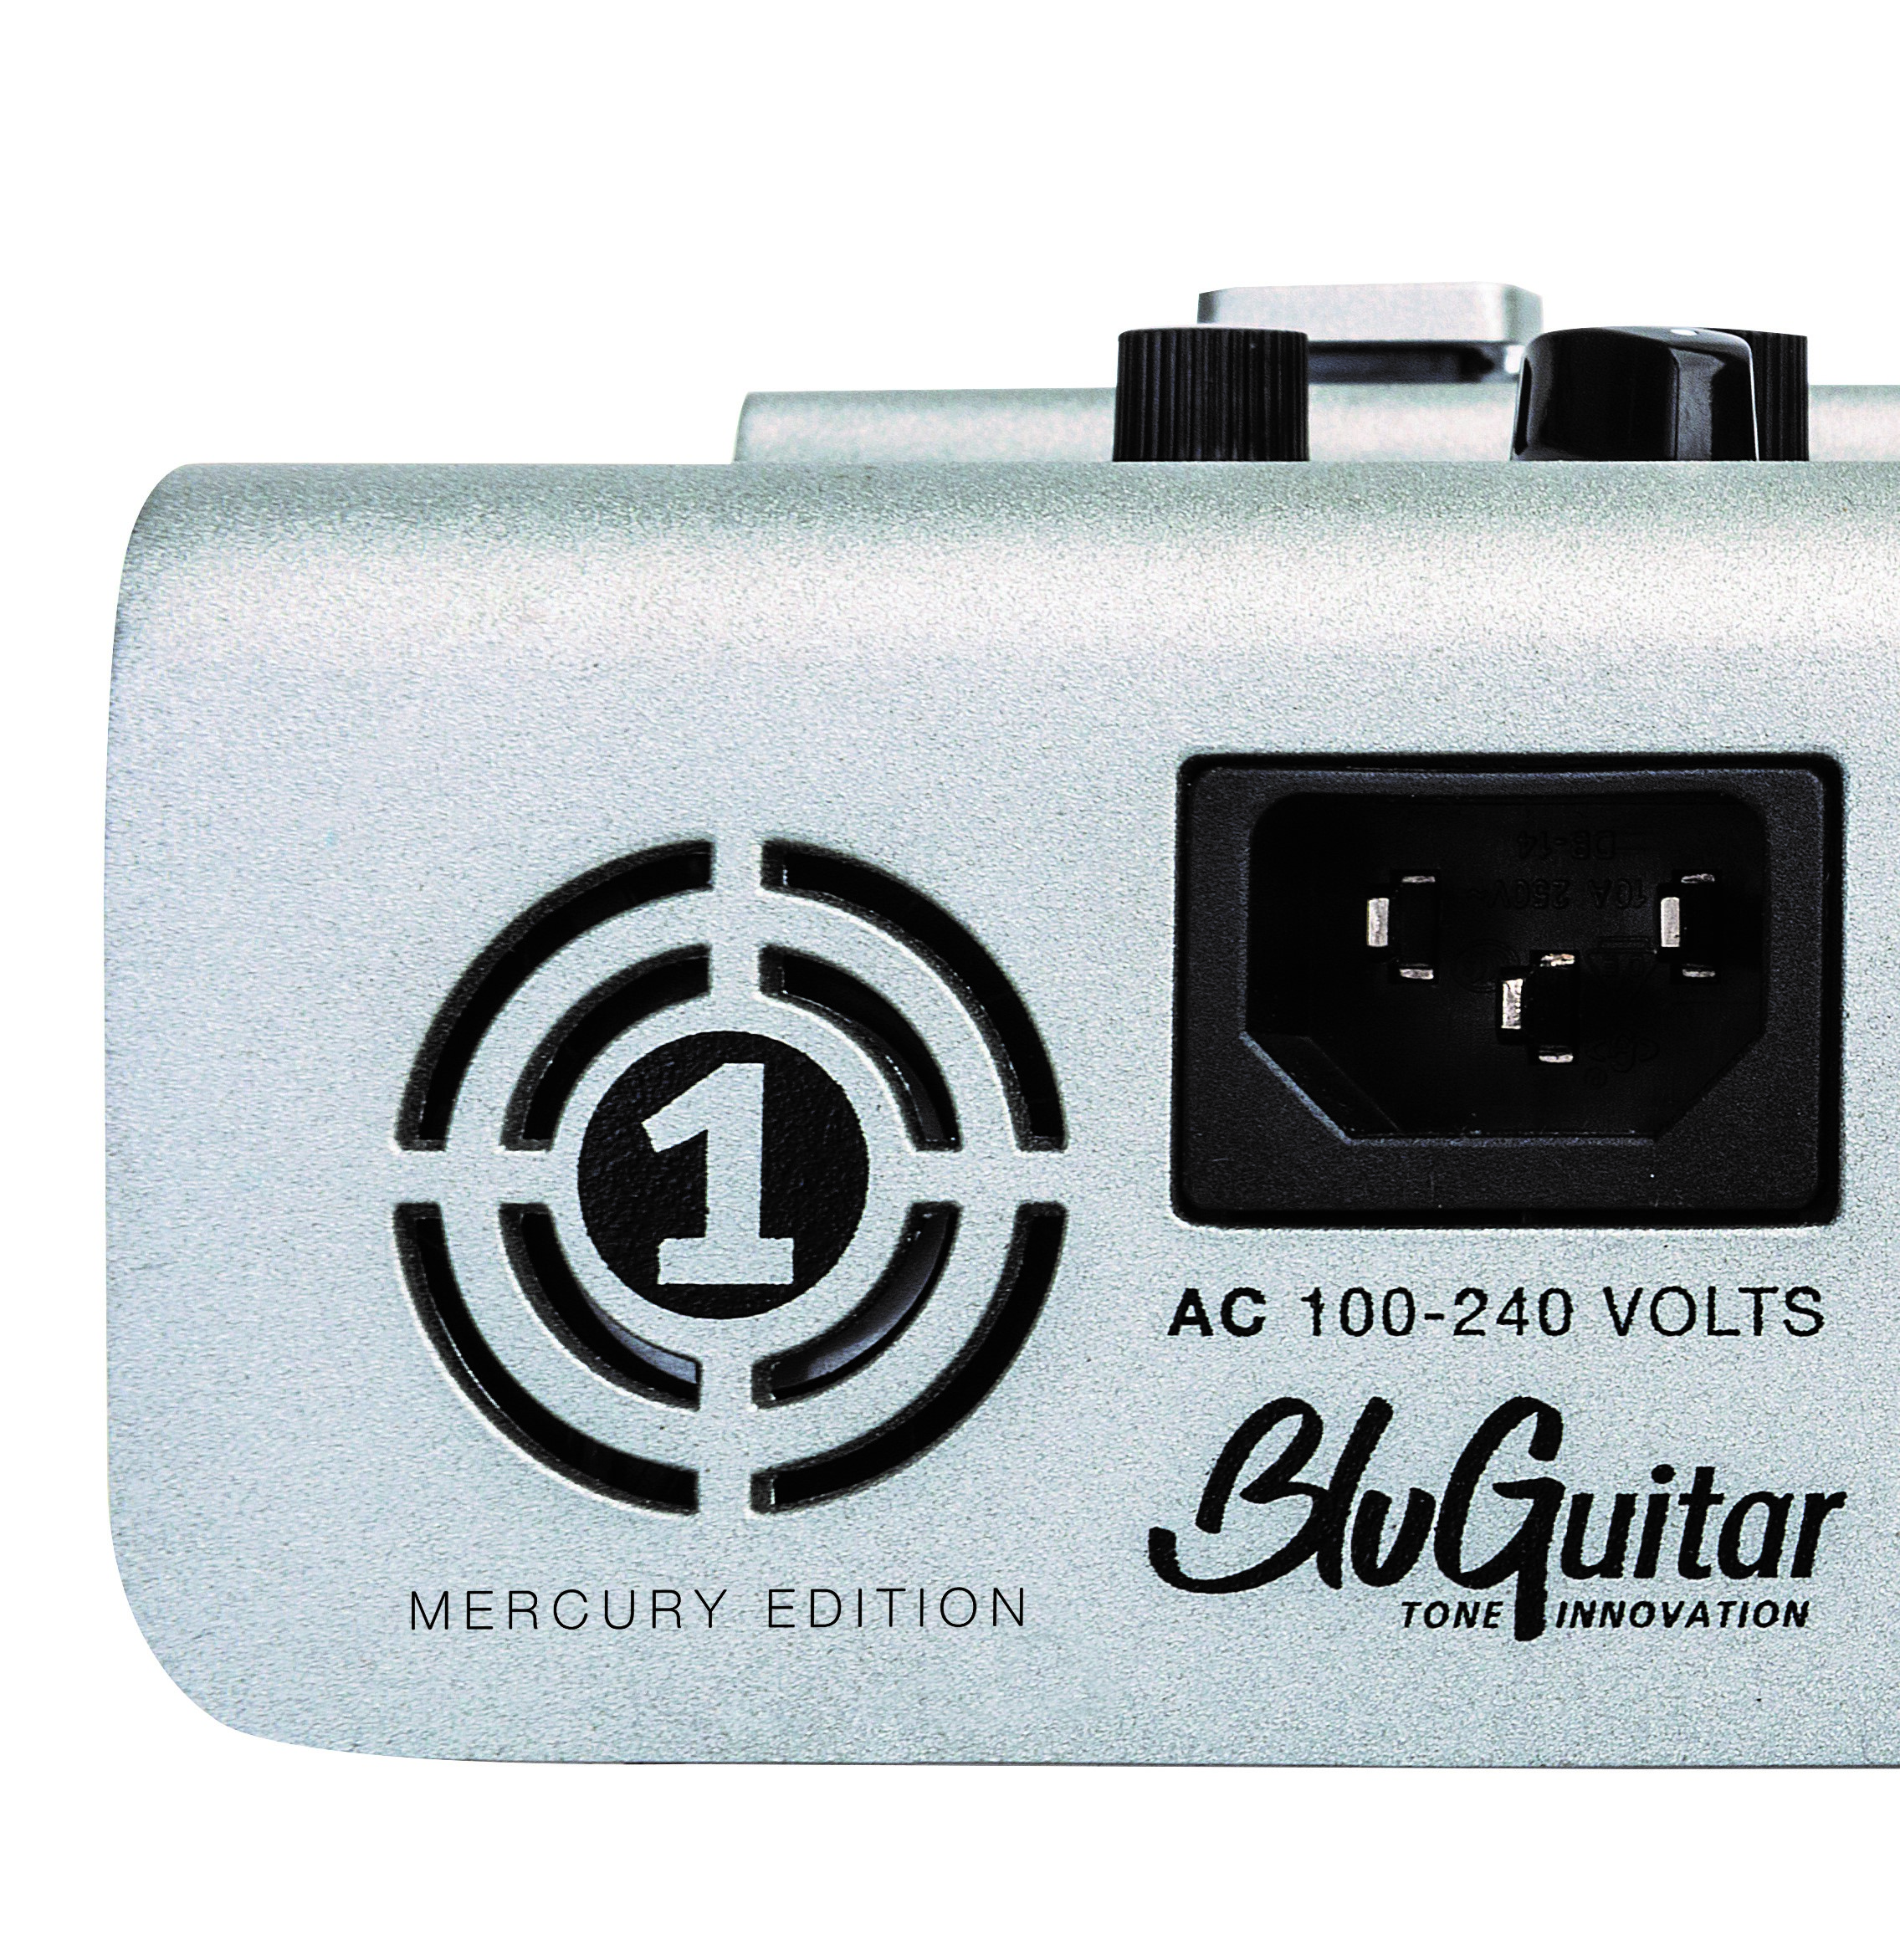
13. Ticking noise when connected to mains
If the AMP1 is connected to the mains via the power cable, you can hear a quiet, high-frequency ticking directly in the device, even if the AMP1 is switched off. This noise comes from the switching power supply and is completely normal.
The mains switch of the AMP1 is located in the secondary circuit. As a result, when the amp is switched off - as with many modern devices - there is no proper disconnection from the mains. Strictly speaking, the AMP1 is then on standby. Therefore you can hear the ticking of the switching power supply, even if the AMP1 is not switched on.
If that bothers you, you should use a switchable power strip with which you can completely disconnect the device from the mains by switching it off.
14. Hum in the speaker cabinet when connected to mains
If the AMP1 is connected to the power supply via the standard power cable and to a loudspeaker cabinet via a speaker cable, there is a quiet but audible hum in the cabinet itself, even when the AMP1 is switched off. This is perfectly normal.
The mains switch of the AMP1 is located in the secondary circuit. As a result, when the amp is switched off - as with many modern devices - there is no proper disconnection from the mains. Strictly speaking, the AMP1 is then on standby. The transformer therefore creates its magnetic field even when it is switched off, which then spreads directly into the speaker and becomes audible. Incidentally, a similar phenomenon occurs with many other tube amps.
If this bothers you, you should use a switchable power strip with which you can completely disconnect the device from the mains by switching it off when not in use.
15. The internal boost cannot be used as a 2nd master volume.
AMP1's BOOST is a two-stage gain boost situated before the amp's channels. The Custom Control potentiometer on the side of the AMP1 controls the amount of gain in the BOOST, and thus primarily the degree of distortion. Turned up halfway, the signal becomes more transparent (similar to a treble booster) and receives more gain. After that, the BOOST itself also starts to overdrive slightly (similar to a Tube Screamer). A moderate increase in volume (which is more noticeable in the clean channel than in the overdrive channels) is associated with this because the sound becomes more concise, but the internal BOOST of the AMP1 is the wrong tool for a volume boost.
The 2ND MASTER VOLUME function of the AMP1 is suitable for a sound-neutral increase (or reduction) of the volume, which can be called up using the REMOTE1 or MIDI. Alternatively, you can use a minus booster or a volume pedal in the serial effects loop to control the overall volume.