User manual
Function overview and operation of the 1Control
Function overview
-
1CONTROL extends the capabilities of the BluGuitar AMP1 (Mercury, Iridium & Silver) by providing access to internal controls and features that can otherwise only be controlled with REMOTE1 or MIDI1:
- Two master volumes for rhythm and lead via foot switch
- Two gain settings for rhythm and lead via footswitch
- Call up two sounds (GAIN + MASTER) via foot switch
- POWERSOAK adjustable from 0.15W – 100W
- FX-LOOP via footswitch
- Preset mode via “Midi Learn” with up to 4 PRESETS
- PRESETS include GAIN, MASTER, POWERSOAK, BOOST, REVERB, FX-LOOP ( FX-LOOP not available on AMP1 “Silver” )
- Status LED red and blue for MODE, SOUNDS, PRESETS
- Status LED purple for displaying setting changes
- “Stand-alone” and expandable with double foot switch
- Operation without power supply (on footswitch socket of the AMP1)
- Compact design
Commissioning
< BEFORE switching the AMP1 on or off, turn the MASTER (top right) on the AMP1 to “zero” >
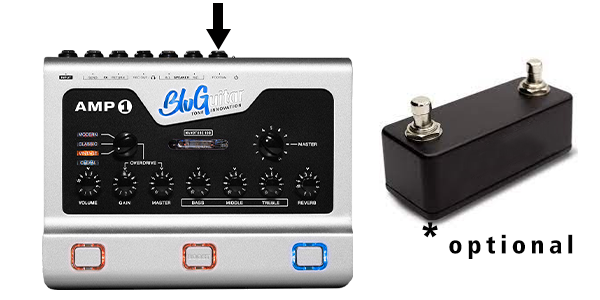
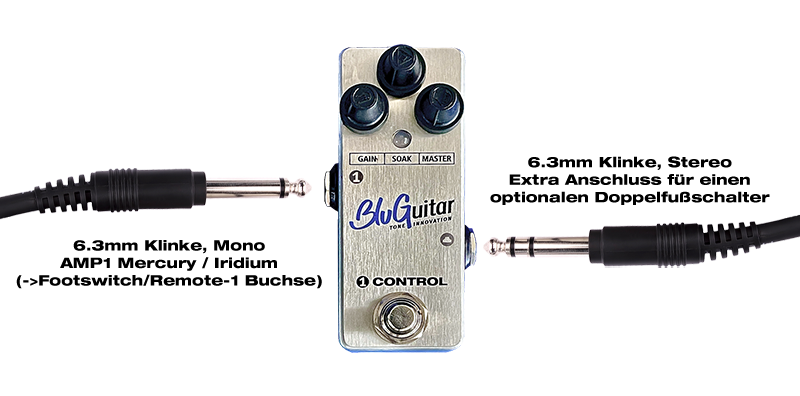
Connect the LEFT jack socket of the 1CONTROL to AMP1 (footswitch / remote socket) using a 6.3 mm (1/4”) mono jack cable. 1CONTROL does not need a power supply, it is supplied by the AMP1 via phantom power.
Optional: The RIGHT jack socket of the 1CONTROL can be connected to a dual foot switch* via a 6.3 mm (1/4”) STEREO jack cable (TRS).

Operating modes
DIRECT ACCESS MODE: (the LED lights up red when switched on/plugged in)
- 2 SOUND settings for GAIN & MASTER (A/B) switchable
*With an additional double foot switch you can also switch:
- FX-LOOP “On/Off” switchable (Switch 1 / TIP of the stereo jack plug)
- “TOGGLE” between AMP1-Channel CLASSIC and MODERN (Switch 2 / Ring
of the stereo jack plug)
- PRESET MODE with up to 4 PRESETS: (the LED lights up blue when
Switch on/plug in)
2 PRESETS for CHANNEL, GAIN, MASTER, BOOST, REVERB, FX LOOP “On/Off”
Can be stored on internal foot switch
- 2 additional PRESETS, accessible via external footswitch on switches 1 and 2
Connections and controls

*POWERSOAK - to reduce the output power of your AMP1 from 0.15 – 100 watts
In the middle position, the range is switched from 0.15 - 2 watts for home to 7 - 100 watts, which creates a
Volume jump, which is “normal” and shows that the POWERSOAK control is working.
In order to perceive the power amplifier saturation or power amplifier distortion, there must be sufficient level in
the power amplifier. For this purpose, GAIN, VOLUME and especially MASTERVOLUME
should be set accordingly high (at least 5); the higher, the more audible the effect.
Attention! MASTERVOLUME on AMP1 > 5 is damn loud! Therefore first turn on the POWERSOAK on
Turn down 1CONTROL , then slowly turn up the MASTER on AMP1 until the desired
effect. Of course, when reducing the power to low values such as 2 or 7 watts, even with
a lower volume can be expected.

How GAIN works
AMP1 uses a unique circuit concept that allows, in addition to the
Sounds and settings that can be adjusted using the controls on the AMP1,
to implement even more functions and sounds. These functions can only be used via
REMOTE1, MIDI1 and 1CONTROL .
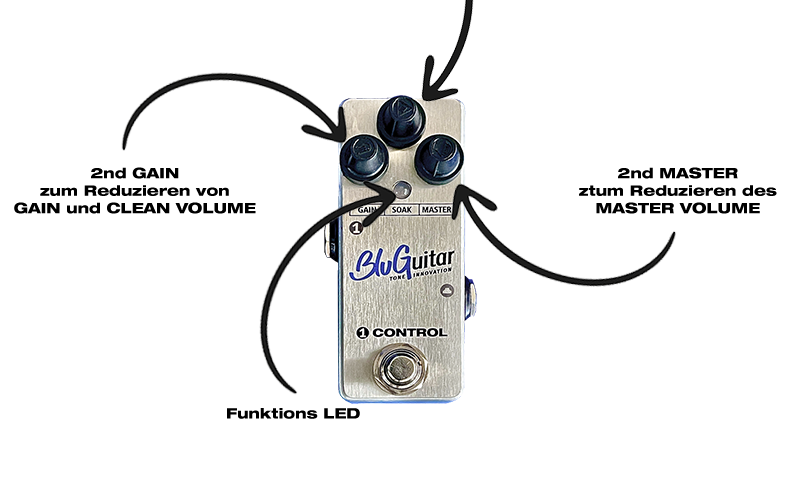
This allows you to adjust GAIN and CLEAN VOLUME using one of these controls in the
The 2nd GAIN control integrated in the circuit can be continuously reduced.
This allows the controls on AMP1 to be turned up further and the 2nd GAIN to be
Reduces harsh highs and excessive distortion.
This allows for warmer, woodier and rounder sounds for blues, for example.
Example: VINTAGE CHANNEL for rock and blues
Make sure that the left socket of the 1CONTROL is connected to a MONO jack cable with
connected to the REMOTE socket of your AMP1.
Check whether the 1CONTROL is in DIRECT ACCESS MODE. This is indicated by the
red flashing LED when switching on the AMP1. If the LED lights up blue, switch
the AMP1 off again and hold the foot switch of the 1CONTROL when switching on the AMP1
pressed. The LED should now light up red.
1) Set the GAIN control of the AMP1 to “10”
Turn the GAIN control on 1CONTROL “fully up” (5 o’clock position)
=> AMP1 preamplifier gets “GAIN 10” for rock
2) Set the GAIN control of the AMP1 to “10”
Turn down the GAIN control 1CONTROL (7 o’clock position)
=> AMP1 preamplifier only gets minimal GAIN for blues
A NOTICE:
Setting changes are indicated by the purple LED.
How the MASTER controller works
Using the right MASTER control, you can adjust the master volume set on the AMP1
This allows you to set a rhythm and a solo volume that you can
can be accessed via the foot switch. To program the volume, set the control to
the value you want. Then press the foot switch until the LED in
the color of the first PRESET flashes. Then, by pressing the foot switch again,
saved.
You set your second volume by first accessing the second PRESET by
by pressing it again. Now set the 2nd MASTER control to the
desired value. Then hold the foot switch until the LED changes to the color of the 2nd PRESET
By pressing the foot switch again you save the value.
TIP:
In DIRECT ACCESS MODE, the two PRESETS store not only 2nd MASTER, but
also 2nd GAIN.
This allows the 2 sounds for solo and rhythm to be used (if desired)
refine; e.g. full GAIN and MASTER for the solo sound and reduced GAIN and
MASTER for the rhythm sound.
- Set the three left controls of AMP1 (VOLUME, GAIN, MASTER) to “10”.
- Individual values of GAIN and MASTER each for the two PRESETS in the 1CONTROL
save.
How the SOAK controller works
The benefit of the POWER SOAK of the AMP1 power amplifier is the reducible
Output power that is based on the operation of classic all-tube amplifiers and
This means that the AMP1's maximum output power of 100 watts can be reduced to 0.15 watts.
The higher the SOAK value* on the 1CONTROL (turn anti-clockwise), the more attenuation of the output power.
The SOAK control has a “GLOBAL” effect, which means that it has priority over all control values of the AMP1 and 1CONTROL .
- Left = 100% SOAK approx. 0.15 watts
- Right = 0 % SOAK approx. 100 watts
- Middle = here there is a volume jump from HOME to STAGE area of the “normal”
and shows that the POWERSOAK control also works.
Shortly before the jump, the power amplifier still delivers 2 watts for home use. If you turn a little further
on, it switches to STAGE and it is immediately 7 watts.
The POWERSOAK function in DIRECT ACCESS MODE works “GLOBAL” and can also
can be used according to taste.
< BEFORE switching the AMP1 on or off, turn the MASTER (top right) on the AMP1 to “zero”! >
1) Adjust the SOAK control on 1CONTROL .
2) Turn up the MASTER control of AMP1 until the level set with the SOAK control
associated performance limit is reached and the SOAK effect is noticeable.
SOUND TIP:
Typical power amplifier saturation sounds soft, “bassy”, rich in overtones and warm “soupy” to
"muddy". It delivers a compressed feel, pronounced sustain and vintage tone,
especially for clean and crunch sounds. These sounds are for vintage freaks and for
Suitable for special recording and rehearsal situations in living rooms / during night-time rest.
Operating modes in detail
When the AMP1 is switched on, the LED shows the current operating mode.
The current operating mode of the 1CONTROL is indicated by its status LED:
- Status LED flashes RED =
“DIRECT ACCESS” for 2 sounds on the internal footswitch - Status LED flashes BLUE =
“PRESET MODE” for up to 4 PRESETs in combination with an additional dual foot switch*
Switching from DIRECT ACCESS MODE (red LED) to PRESET MODE (blue LED):
Turn off AMP1, hold down the 1CONTROL footswitch and turn on AMP1 at the same time.
When the status LED of the 1CONTROL flashes, release the foot switch of the 1CONTROL .
DIRECT ACCESS MODE (SOUND A/B)
Stores two individual GAIN and MASTER SOUNDS in 1CONTROL that are common to ALL AMP1
Channels apply globally.
SAVING SOUND A/B
1) Activate DIRECT ACCESS mode on the 1CONTROL
2) Press the foot switch to select the desired SOUND (storage location)
- Status LED lights BLUE = SOUND A
- Status LED lights RED = SOUND B
3) Set the desired control values of GAIN and MASTER on 1CONTROL .
4) Press and hold the 1CONTROL foot switch until the status LED flashes
5) Release the foot switch (status LED lights up in the bank color in which the data is being saved)
6) Press the footswitch twice to save the values in this selected bank
A NOTICE:
- SOAK can be controlled globally (affects SOUND A and B, but is not saved).
- Stored values can be changed temporarily if necessary by moving the controls
GAIN / MASTER can be turned without saving afterwards.
When changing to another PRESET / BANK or restarting AMP1, the
originally stored values are retrieved.
PRESET Mode
- Store up to 4 PRESETS (2 on the internal footswitch, plus 2 more with
optional 2-way foot switch)
- Individual control values of (GAIN, SOAK, MASTER)
- Including the switching states of AMP1 (CHANNEL as well as BOOST, REVERB, FX-LOOP "ON / OFF")
1) Activate PRESET MODE:
Hold down the 1CONTROL footswitch and switch on AMP1 at the same time.
When the status LED flashes, release the foot switch.
The current operating mode is indicated by its status LED:
Status LED flashes RED = DIRECT ACCESS MODE (in this case repeat step 1)
Status LED flashes BLUE = “PRESET MODE”
2) Determine whether the FX LOOP is “ON / OFF” in this PRESET:
Hold down the foot switch for 2 seconds (long push)
1CONTROL LED briefly lights up BLUE = FX-LOOP “ON”
Repeat if desired:
Hold down the foot switch for 2 seconds (long push)
1CONTROL LED briefly lights up RED = FX-LOOP “OFF”
TIP:
The switching state of the FX-LOOP can be easily checked by
has activated an audible effect (e.g. delay pedal) during the storage process.
Create and save PRESETs
GAIN, SOAK and MASTER, AMP1 CHANNEL, BOOST and REVERB “ON/OFF” are set in the PRESETS
saved.
1) Set the desired values of GAIN, SOAK, MASTER for this PRESET
2) For this PRESET desired CHANNEL (CLEAN, VINTAGE, CLASSIC, MODERN) and
Set BOOST “ON/OFF” and REVERB “ON/OFF” on the AMP1 Mercury Edition / Iridium Edition
3) Press and hold the “BOOST” button on the AMP1 for about 2 seconds (flashing yellow)
4) Press the footswitch to which you want to save this PRESET -> DONE!
Possible storage locations:
1) internal foot switch (PRESET 1 = blue LED lights up)
2) internal foot switch (PRESET 2 = red LED lights up)
optionally with external dual foot switch*:
3) Switch 1 (PRESET 3)
4) Switch 2 (PRESET 4)
* 1CONTROL is compatible with many commercially available 2-way foot switches / amp channel switches)
CREATE AND SAVE PRESETS
TIP:
The Channel Select, Boost and Reverb footswitches on the AMP1 remain usable. These
can be additionally activated / deactivated in the active PRESET if required.
If something got mixed up during the saving process, simply repeat steps 1 – 4
Repeat for the desired PRESET or footswitch.
This allows you to make adjustments to the respective
Save PRESETS.